Showing posts with label Master Bathroom. Show all posts

Thursday, August 8, 2013

Lighting

It's been awhile (a long while) and no promises but I decided I needed to start recording these updates on a regular basis again. We'll see how that actually goes...

I've done a few updates to the lighting since I last posted including getting a new fixture for the front entry and moving that fixture to the back entry which made a huge difference.


That being said there is still a long ways to go. I despise boob lights. Could there really not have been a better choice then these jokers?

Main Image
Capital Lighting

They are builder grade and due to us having a very limited budget while building these lovelies were scattered throughout our house. Now that we are becoming a little more settled (still a LONG way from being comfortable though) I'm starting to become ready to switch them out for more up-to-date fixtures with a bit more character. Although this house started as a 5-7 year house for us, we're already at 4 years and have no plans to even being moving anytime soon....although I did recently list us on Zillow at a make-me-move price about $75,000 over the last estimate of our house. That's why it's classified as "Make Me Move" right?

Here are some updates I'd like to get to eventually. I keep lots of records on my Pinterest boards now but that doesn't record where we've been & the path along the way :).

KITCHEN:
1. It's so dang dark in here, I want to put in some under cabinet lighting operated on a switch.
source
2. Again, speaking of the darkness, I'd like to add a semi-flush mount fixture in the center of the room. I loved this one but apparently Ballard doesn't carry it anymore.

kitchen or upstairs
source
3. I really like the look of little pendants hanging down over the sink. I don't know if this would end up being too busy & I don't know about having to have pretty bulbs but I like this one.

Claudia 1-Light Pendant  | Ballard Designs
source

LAUNDRY ROOM:
This just has your standard boob light which does a good enough job of lighting up the room but I'd like a little more character. Something along these lines but less expensive & smaller.

Benson 4 Lt Pendant | Ballard Designs
source

STAIRS:
The lights we currently have are good enough but not really my style. I'd like something low-profile but with style, like this, but that emits a bit more than just a "warm glow."

Francis Sconce
source

TIM'S CLOSET:
Poor guy has a straight-up florescent fixture, ugly as can be & awful colored lighting no matter the bulb. I'd like to get him something that gives better light for him & isn't ugly (for me).

Chase Semi Flush Mount - Tim's Closet?
source

UPSTAIRS BEDROOMS, BONUS ROOM & MASTER BEDROOM:
I know some people don't like ceiling fans but around here the mugginess just sits on you like a wet blanket and without the extra airflow from ceiling fans in the bedroom it just gets to be a bit stifling. That being said, I'd like to have ceiling fans that are attractive and add to the room rather than detract. The upstairs rooms & bonus room currently only have lights in them & we have an ugly ceiling fan with a light kit so I'd like to replace all four with something like this, but not $400 each, yikes!

Hunter 52-in Palermo Brushed Bronze Ceiling Fan with Light Kit and Remote ENERGY STAR
source

FAMILY ROOM:
We currently have 4 can lights & a fan in the den but although the plan was originally to add a light kit to the fan I think I'd rather just replace it. If I couldn't convince Tim to get rid of the fan altogether I'd likely just get the same as what is in the bedrooms but I think some negotiating with putting the fan in the bonus room just might let me get away with getting rid of that one. In that case I think I want a rustic looking chandelier which I haven't seen any of that really interest me just yet.

HALLWAY:
Our upstairs hallway just has can lighting (smart!) but our downstairs hallway still has a boob light. I think that I'd like to replace it with the flush-mount that matches all of our other pieces.

Main Image
source

HALF BATH & OFFICE:
I can't remember if the half-bath has a vanity light fixture or if it has a ceiling mount. I could swear to you that it is a ceiling mount though. I have some big plans for this room (at least for now) which a large light would compete with too much so I think I want something pretty, but low-profile.

The office has the most basic flush-mount imaginable right now with no character at all but I'd like to replace it with this very simple flush-mount that does not look like a boob. (side-note: I'd also consider this for the Laundry Room & for the Hallway).
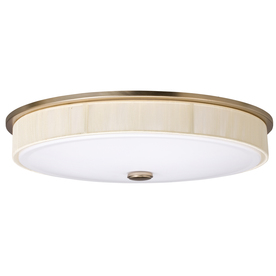
Portfolio 17.3-in W Aztec Painted Champagne Ceiling Flush Mount
source

MASTER BATH & GUEST BATH:
This is our current fixture in our master bathroom & I'm pretty sure its the same but with a different number of lights for the guest bathroom:

Main Image
source
Nothing really bad about it, but nothing particularly interesting either. I also want to frame in our mirror & put a built-in cabinet between our sinks for more storage so we will need two separate fixtures for that to work. 

For our master bath, I'd like something a little quirky & am willing to spend a bit more since I will be using it/seeing it multiple times each day. Something like this could be fun.

Rebecca 2 Light Vanity Sconce  | Ballard Designs
source

For the guest bathroom I think I'd end up waiting to see if our first child ends up being a little girl or a little boy because I love both of these (although they'd both be too small).

Little Girl:
Claire Three-Light Vanity - upstairs bathroom?
source
Little Boy (in antique brass):
Emma 3 Light Vanity Sconce - upstairs bathroom?
source

Ultimately I think we can all learn a lesson from this...boob lights are not a necessity and even builder basic could transition into something much more attractive such as this. :)

Main Image
source


Wednesday, November 28, 2012

Updates (Downstairs) - pictures & details to follow!

Front Entry
- Got a rug (HomeDecorators.com)
- Got a new light (Ballard Designs)
- Got a table (Craigslist - $35)
- Got some art (by friends)
- Made some curtains (I did it)

Dining Room
- Got rid of the table & chairs (sold on Craigslist)
- Got a hutch/china cabinet (Ballard Designs)

Hallway
- Got rugs (West Elm)
- Got art (frame gallery fm Target, others custom framed)

Office
- Painted (mixed a few random colors together)
- Built desk & shelf (I did it)
- Built in corkboard (I did it)

Back Entry
- Replaced light (from front entry)
- Got a vase... (that empty area was killing me - Neiman Marcus)

Family Room
- Got a TV (& surround sound - thanks lightning storm - Jeff Lynch)
- Got some art (custom framed & donated by Grandma)
- Got tables (Rug & Home)
- Got couches (Hand me downs, sold the others on Craigslist)
- Got lamp (local antique store)
- Got pillows (Pottery Barn)

Kitchen
- Curtains (shower curtain from Pottery Barn, spray painted rod from West Elm)
- Art (spray painted EAT from Hobby Lobby, frames from Pottery Barn)
- Under cabinet storage (Lowe's)
- iPad mount (gift from brother & sister-in-law)
- Barstools (hand-me-downs)
- Rug (Pottery Barn)
- Trash Can (Bed, Bath & Beyond)
- Added spice rack to lower cabinet (Lowe's)

Pantry
- New shelving configuration (I did it)

Master Bedroom
- Quilt (Pottery Barn)
- New Dog Bed (I did it)
- New buffet (Local antique store refinished by me)
- Bedskirt (Pottery Barn)
- Art (by me)
- New TV (Best Buy Black Friday purchase)
- Bedside lamps (Pottery Barn)

Master Bathroom
- New rugs (Pottery Barn)
- New towels (Belk)
- Updated gallery wall (by me)
- Reconfigured Tim's Closet (by me)
- Reconfigured My Closet (by me)
- New toilet plunger (ooh fancy... - Lowe's)

Half (Guest) Bath
- Storage Cabinet (Pottery Barn)

Laundry Room
- Air Register (Lowe's)
- Art (Ballard Designs)
- Drying Rack (Ballard Designs)
- Rug (Ballard Designs)

Tuesday, May 29, 2012

No Excuses

There've been quite a few changes in my life recently not limited to a new job, raising almost $15,000 for cancer research, dealing with multiple different courses of treatment for Tim (and about to start a new one), trying to keep a house together, trying to keep my sanity & trying to keep up a social life, but honestly I just got bored of blogging for awhile (pbly bc I've been keeping up with Tim's blog so much). Still probably won't be back full time but thought I'd catch everyone up on what I've been up to lately!

So here are a few posts you can look forward to reading sometime (hopefully soon):

A new dog bed - constructed by me (& my dad)
My latest obsession - Accupuncture!
Dehydrating Food - aka what not to do
Refinishing a buffet - still can't believe I did it
Some things I'm dreaming about right now
Hanging a flatscreen/hiding the cables
New kitchen rug, trash can (& soon curtains)
New hallway runner(s) & art
New bedroom art
Restructuring the bathroom gallery wall
Curtains for the front door
New art for the den & new (to us) couches
San Francisco Trip
Refresh of the pantry
Little landscaping refresh
Garage Clean-out/Basement Organization

And here are some (hopefully) upcoming projects that will be happening at the hizzay sooner than later:

Cabinets in the laundry room
Replace transom in the laundry room (seriously dad...lets finish this one! :))
Staining/sealing the back deck (yep 2 1/2 years later we still haven't done this)
More landscaping...
Master Bedroom curtains
Hallway Art Project
Master Bedroom Art Project(s)
Front/Back Hall Light Replacements (might as well do it at the same time)
Front Hall Rug

....told you I've been busy.

Wednesday, October 5, 2011

Shower Upgrade

This is a little "upgrade" I did awhile ago for us. When Tim is on chemo he can't get his injection site wet so having a handheld sprayer is a must but I'm not a huge fan of them, no particular reason why, I'm just not a fan...

We had some money leftover on a Bed, Bath & Beyond gift card where I found this little beauty. It was the perfect compromise for both his needs & my wants, the best part is how easy it was to install.


Here are all of the parts all laid out in their glory.


Here is the old leaky showerhead


First I removed it & saw the tape was good to go so I didn't have to wrap anymore which is great because I am terrible at that task.


I then screwed on the base portion


Next I screwed on the hose, then figured out I screwed it onto the wrong part so I unscrewed it & moved it to the correct position.


Finally I screwed both showerheads on & they were good to go!

Tuesday, September 28, 2010

Finally....A Gallery

I'm sure that if you've been following my blog then you've seen me post about having a gallery wall. I have a slight obsession with them as you can see here: Hallway...well because its easy and here: Movin' on Up. Well I finally made one and not in either place I previously mentioned.

The wall beside my sink in our master bathroom always bugs me, I stare at it a good bit as I'm getting ready and it is visible from my side of the bed at night. For some reason I have a fear of blank walls but I also like art to mean something (whether its a feeling it evokes from me or is something personal). I finally just decided to suck it up and get a gallery wall going.


First I gathered some random frames from my house, my parent's house and Hobby Lobby's half-off sale. To be honest I had no idea what I was going to put in any of them just knew that I wanted to get a few different sizes and shapes up there and bought a can of Rustoleum Heirloom White spray paint. I've used this stuff previously and love it because of the coverage it gives me. Two coats and I'm done! Plus it dries really fast which means that people with short attention spans such as myself are satisfied.


If there was glass that couldn't be removed I just taped over it, btw the oval was a slight pain.


I covered the driveway with newspaper and got to spraying. Two quick coats and these babies were ready to be hung within an hour (note: this picture was after coat #1)


Next I went inside and measured my space and roughly taped it out on the floor.


I played around and got the frames arranged in a general pattern that I liked before I decided to just roll with it and start hanging them up.


Next I started from the bottom and worked my way towards the top arranging & rearranging as I went using what I had previously laid out as a guide.


Notice that its a little different and became even more different after I rummaged through my house to find pieces and artifacts to fill each frame.


Ta-Da! The end result. I'm pretty happy with it if I do say so myself. I know it could use a little finessing but for a first-timer I think I did a decent job!

Here are some individual shots of each frame in the order they were hung:

This picture is from our wedding although I wanted the main focus to be our hands so I put a soft focus filter on it and made the rest of the image around it fuzzy.


I believe these roses were worn by one of our grandparents although to be perfectly honest I have absolutely no clue. I found them in all of our wedding stuff perfectly preserved after and have saved them for the right display piece. I just added some brown kraft paper and it was good to go.


I actually made this with the premise based upon a co-workers tattoo (roman numerals of her favorite bible verse). These are the roman numerals of our wedding date with the bible verses that were read during the ceremony written out in the background.


This was actually crocheted by my great-grandmother (Gigi) and I've had it in a conspicuous spot where I can see it each day since she passed away. I love that its now framed (with the brown kraft paper again) and is still visible to me every time I pass by.


 This was another of of wedding pictures but of Tim. I wanted the focus to be on his boutonniere so I did the soft-focus effect again and got this.


My mom actually crocheted this belltower from her college campus and I found it in a drawer. I loved the colors and the stitches are super-tiny which was also impressive to me.


Ok I confess this is a random piece of artwork I found somewhere on the internet awhile ago and I plan to replace it but don't know what I will replace it with just yet.


My premise was to feature a picture of each of us separately from the wedding as well as a couple so here is my solo shot with the soft-focus on my bouquet.


No gallery wall would be complete without a shot of the pup. She is so beautiful and pensive!


Another one of my dad's old drawings, he was pretty good!


Ok granted you can't see this really but it was a beautifully addressed invitation and the first we received as a married couple. It was def a framer!


I'm not an advocate of stealing but in my younger and dumber years I did take these from a hotel I stayed in while I was in Rome. I still think they are beautiful and they always remind me of one of the best trips I've ever been on.

Monday, August 23, 2010

1 Flush, 2 Flush, Red Flush, Blue Flush

Ok so this post will be a to be continued....here is the deal. I wanted to "go green" and install a dual-flush system on our master bathroom toilet. Supposedly it saves you some money and with how high our water bills have been recently I'll take what I can get!

I went to our trusty Home Depot and got the Hydro-Right Dual Flush Converter for the bargain price of $20 awhile ago and finally got up the guts and ambition to install it on Saturday morning. I got up and was eager to go to work. Took my "before" picture...


...removed the lid and got ready to got to work.


Ok, everything looks pretty normal until I'm reading the directions and realize that the flapper thingy that covers the hole is supposed to be a separate piece from the tube thing according to their directions so that their big piece can attach (right under the silver button)...and we don't have one. Dang.


A good bit of googling later (let me tell you how easy that is when you don't know the name of the parts...) and I discover that we have a "Mansfield Valve." Sounds like something from the 20s right? In order to install the dual-flush I need a Douglas Valve. So far from everything I've read it looks as though you have to remove the tank...ummm no thanks.

I'm going to confer with the dad and will get back to you on the validity of this experiment. So far the DIY gods are just laughing down upon me. Oh well, another day, another project...

Thursday, July 29, 2010

King of the Throne

Two days, two posts, two bathrooms. This time I'm showing you the big boy though, the master bath. The configuration of this space along with our closets was the #1 reason for the extensive changes we made to the original plans of our house. We had three main requests: 1. That there are 2 closets; 2. That the entrances to those closets opened into the bathroom; 3. That the toilet has its own room.

Although Tim & I typically have to be at work at the same time we never seem to get up in sync with one another so its nice that we can walk in, close the door and it stays nice and quiet in the room for whomever is still sleeping.


We have a few things done in here, I actually just got the bath mat from Pottery Barn last weekend. We were having issues with having to move our previous mat back and forth to catch the water from us & catch the water from the dripping shower door. Now we've got one that covers both issues in one little package.

The print over the toilet was Tim's wedding gift from me. Its a picture of the campus where Tim was coaching and we met, yes so sweet. The only problem is none of the colors in the picture are actually anything I want in the house BUT I wanted it to be somewhere that we could see it every day. The spot right over the toilet fit the bill perfectly.

Tim's a little bitter in that I got lucky with the size of my closet, it was slightly larger to begin with but there was some confusion when the foundation was poured and it ended up granting me an even larger closet. Unfortunately its still too small. Before I had a house to fill and pay for I used to have a thing for shopping, hence my overly full closet. I do have my mom's wedding dress in there though.


I have plans to paint that dresser & replace the knobs but it took a lot of time to get those drawers in with their special little latches so I'm avoiding that situation right now. All of my necklaces are hung up by thumbtacks so I should probably come up with a slightly more attractive solution. I do have a pretty blue little chandelier in there though. Thank you Pottery Barn Teen.

Tim's closet is a little work in progress, but bless him, he has taken on my sense of organization and kept it up. The kid keeps each type of clothing together and even sorts by color every once in awhile. Sometimes he really makes me so proud to be his wife.


Things we have left to do here:


1. Get some tile - Did we fool you? Thinking their might already be tile in there? It's linoleum but I want slate. The area of the bathroom is pretty small and we've got a great discount tile outlet around here with some amazing deals so I don't think we'd have to invest too much. 


2. Get a rug by the sinks - I'm not a huge fan of oranges but I think these are faded and sparse enough that I could live with them. I also really like the unusual shape. Slate floors can be kind of cold so it would be nice to have something a little cozier to stand on while getting ready and I think this rug from Anthropologie would make all the difference.


3. Put art above the towel rod by the sink - I'm at a loss as to what we should put here. I do have a few of my great grandmothers old handkerchiefs that I'd love to be able to group together and frame but I'm afraid that all of the moisture in bathroom may damage them.


4. Get some sort of towel storage furniture - Right now we don't really have a great place to store extra towels and I'm not really sure if we should find something to hang on a wall or get a piece of furniture  and figure out where to place that. I'm leaning more towards the shelf and putting it above the tub but still need to measure it all out. 


5. Get closet organizers - I love anything that is organized, but an organized closet with a place for everything and everything in its place? That is heaven to me. The summer before my freshman year at college I had some of my friends over to get together before we were all separated that fall. I had some boxes labeled and sorted ready to go to school and my lovely friends decided to switch labels as well as the contents of those boxes for me. They all enjoyed my frazzle as I tried to figure out how to get everything back the way it was.