This blog is no longer for keeping readers interested, etc. if you want to follow along all the better, if not no big deal as I'll be (maybe) doing it on my own time and more for tracking myself to see how far I've come. Lots has happened since my last post including the loss of my husband to cancer. Eventually I want to somewhat do a final post and pictures of how far we got with our goals for the first house but it's a hard place to go back to with all of our hopes and dreams centered there along with our life together. We made the decision together to sell it (& found and embark d upon the Reno of this new house) long before he truly got sick but not a day goes by that I don't miss him, our house and our life there.
Tuesday, August 27, 2013
Thursday, August 8, 2013
Lighting
It's been awhile (a long while) and no promises but I decided I needed to start recording these updates on a regular basis again. We'll see how that actually goes...
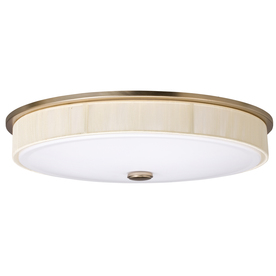
I've done a few updates to the lighting since I last posted including getting a new fixture for the front entry and moving that fixture to the back entry which made a huge difference.
That being said there is still a long ways to go. I despise boob lights. Could there really not have been a better choice then these jokers?
They are builder grade and due to us having a very limited budget while building these lovelies were scattered throughout our house. Now that we are becoming a little more settled (still a LONG way from being comfortable though) I'm starting to become ready to switch them out for more up-to-date fixtures with a bit more character. Although this house started as a 5-7 year house for us, we're already at 4 years and have no plans to even being moving anytime soon....although I did recently list us on Zillow at a make-me-move price about $75,000 over the last estimate of our house. That's why it's classified as "Make Me Move" right?
Here are some updates I'd like to get to eventually. I keep lots of records on my Pinterest boards now but that doesn't record where we've been & the path along the way :).
KITCHEN:
1. It's so dang dark in here, I want to put in some under cabinet lighting operated on a switch.
2. Again, speaking of the darkness, I'd like to add a semi-flush mount fixture in the center of the room. I loved this one but apparently Ballard doesn't carry it anymore.
3. I really like the look of little pendants hanging down over the sink. I don't know if this would end up being too busy & I don't know about having to have pretty bulbs but I like this one.
TIM'S CLOSET:
I've done a few updates to the lighting since I last posted including getting a new fixture for the front entry and moving that fixture to the back entry which made a huge difference.
That being said there is still a long ways to go. I despise boob lights. Could there really not have been a better choice then these jokers?
 |
| Capital Lighting |
They are builder grade and due to us having a very limited budget while building these lovelies were scattered throughout our house. Now that we are becoming a little more settled (still a LONG way from being comfortable though) I'm starting to become ready to switch them out for more up-to-date fixtures with a bit more character. Although this house started as a 5-7 year house for us, we're already at 4 years and have no plans to even being moving anytime soon....although I did recently list us on Zillow at a make-me-move price about $75,000 over the last estimate of our house. That's why it's classified as "Make Me Move" right?
Here are some updates I'd like to get to eventually. I keep lots of records on my Pinterest boards now but that doesn't record where we've been & the path along the way :).
KITCHEN:
1. It's so dang dark in here, I want to put in some under cabinet lighting operated on a switch.
 |
| source |
 |
| source |
 |
| source |
LAUNDRY ROOM:
This just has your standard boob light which does a good enough job of lighting up the room but I'd like a little more character. Something along these lines but less expensive & smaller.
 |
| source |
STAIRS:
The lights we currently have are good enough but not really my style. I'd like something low-profile but with style, like this, but that emits a bit more than just a "warm glow."
 |
| source |
TIM'S CLOSET:
Poor guy has a straight-up florescent fixture, ugly as can be & awful colored lighting no matter the bulb. I'd like to get him something that gives better light for him & isn't ugly (for me).
 |
| source |
UPSTAIRS BEDROOMS, BONUS ROOM & MASTER BEDROOM:
I know some people don't like ceiling fans but around here the mugginess just sits on you like a wet blanket and without the extra airflow from ceiling fans in the bedroom it just gets to be a bit stifling. That being said, I'd like to have ceiling fans that are attractive and add to the room rather than detract. The upstairs rooms & bonus room currently only have lights in them & we have an ugly ceiling fan with a light kit so I'd like to replace all four with something like this, but not $400 each, yikes!
 |
| source |
FAMILY ROOM:
We currently have 4 can lights & a fan in the den but although the plan was originally to add a light kit to the fan I think I'd rather just replace it. If I couldn't convince Tim to get rid of the fan altogether I'd likely just get the same as what is in the bedrooms but I think some negotiating with putting the fan in the bonus room just might let me get away with getting rid of that one. In that case I think I want a rustic looking chandelier which I haven't seen any of that really interest me just yet.
HALLWAY:
Our upstairs hallway just has can lighting (smart!) but our downstairs hallway still has a boob light. I think that I'd like to replace it with the flush-mount that matches all of our other pieces.
 |
| source |
HALF BATH & OFFICE:
I can't remember if the half-bath has a vanity light fixture or if it has a ceiling mount. I could swear to you that it is a ceiling mount though. I have some big plans for this room (at least for now) which a large light would compete with too much so I think I want something pretty, but low-profile.
The office has the most basic flush-mount imaginable right now with no character at all but I'd like to replace it with this very simple flush-mount that does not look like a boob. (side-note: I'd also consider this for the Laundry Room & for the Hallway).
 |
| source |
MASTER BATH & GUEST BATH:
This is our current fixture in our master bathroom & I'm pretty sure its the same but with a different number of lights for the guest bathroom:
 |
| source |
Nothing really bad about it, but nothing particularly interesting either. I also want to frame in our mirror & put a built-in cabinet between our sinks for more storage so we will need two separate fixtures for that to work.
For our master bath, I'd like something a little quirky & am willing to spend a bit more since I will be using it/seeing it multiple times each day. Something like this could be fun.
 |
| source |
For the guest bathroom I think I'd end up waiting to see if our first child ends up being a little girl or a little boy because I love both of these (although they'd both be too small).
Little Girl:
 |
| source |
Little Boy (in antique brass):
 |
| source |
Ultimately I think we can all learn a lesson from this...boob lights are not a necessity and even builder basic could transition into something much more attractive such as this. :)
 |
| source |
Wednesday, November 28, 2012
Updates (Downstairs) - pictures & details to follow!
Front Entry
- Got a rug (HomeDecorators.com)
- Got a new light (Ballard Designs)
- Got a table (Craigslist - $35)
- Got some art (by friends)
- Made some curtains (I did it)
Dining Room
- Got rid of the table & chairs (sold on Craigslist)
- Got a hutch/china cabinet (Ballard Designs)
Hallway
- Got rugs (West Elm)
- Got art (frame gallery fm Target, others custom framed)
Office
- Painted (mixed a few random colors together)
- Built desk & shelf (I did it)
- Built in corkboard (I did it)
Back Entry
- Replaced light (from front entry)
- Got a vase... (that empty area was killing me - Neiman Marcus)
Family Room
- Got a TV (& surround sound - thanks lightning storm - Jeff Lynch)
- Got some art (custom framed & donated by Grandma)
- Got tables (Rug & Home)
- Got couches (Hand me downs, sold the others on Craigslist)
- Got lamp (local antique store)
- Got pillows (Pottery Barn)
Kitchen
- Curtains (shower curtain from Pottery Barn, spray painted rod from West Elm)
- Art (spray painted EAT from Hobby Lobby, frames from Pottery Barn)
- Under cabinet storage (Lowe's)
- iPad mount (gift from brother & sister-in-law)
- Barstools (hand-me-downs)
- Rug (Pottery Barn)
- Trash Can (Bed, Bath & Beyond)
- Added spice rack to lower cabinet (Lowe's)
Pantry
- New shelving configuration (I did it)
Master Bedroom
- Quilt (Pottery Barn)
- New Dog Bed (I did it)
- New buffet (Local antique store refinished by me)
- Bedskirt (Pottery Barn)
- Art (by me)
- New TV (Best Buy Black Friday purchase)
- Bedside lamps (Pottery Barn)
Master Bathroom
- New rugs (Pottery Barn)
- New towels (Belk)
- Updated gallery wall (by me)
- Reconfigured Tim's Closet (by me)
- Reconfigured My Closet (by me)
- New toilet plunger (ooh fancy... - Lowe's)
Half (Guest) Bath
- Storage Cabinet (Pottery Barn)
Laundry Room
- Air Register (Lowe's)
- Art (Ballard Designs)
- Drying Rack (Ballard Designs)
- Rug (Ballard Designs)
Thursday, September 27, 2012

Monday, June 4, 2012
Updated Hallway
As promised, I'm back with some updates...
I've been desperate to get one room in our house finished. I never realized just how expensive & time consuming decorating a house would be. For us its been a combination of lack of funds & lack of time that have really kept our house from becoming what I want it to be. Thanks to my Uncle Sam savings plan (aka paying more into taxes than I should just so I can get a fat little check once a year - I know, not the best idea ever) I finally have (almost) finished up a room - all that is lacking now are the pictures & crown molding (moulding?).
So in case you've forgotten, here is what the hallway looked like originally as well as what my plans were. A family gallery wall may be something we work on later but for now it's gotten the kibosh. Instead I decided to combine a few of my ideas from around the house into this area. I've been looking for a runner everywhere I go for this space but a 2.5'x14' runner is not an easy find (FYI- when building a house make sure you look at what size rugs will fit in each room & make sure standard sizes fit. Trust me on this one). I finally found one I liked at West Elm, unfortunately it was exactly half the length of what I needed.

Lucky for me, inspiration hit. Why wouldn't this look just fine lying next to another with the patterns butting up against one another? I ordered 2 during their 20% off rug sale and waited for delivery. I rolled them out the second I got home & got lucky that my plan worked pretty well. Its been a few weeks and they are still settling a bit but so far rug pads seem to be holding them pretty steady although I think I may use some carpet seam tape to make sure they are really secure. They've also held up pretty well for being so close to the entrance and with a puppy and husband who come in the house with who knows what on their feet.


That same weekend I went to an event called Artisphere where lots of local artists have tents and sell their creations. I found one painter whom I loved and he happened to have a framed painting he was selling of the area where Tim & I took our mini-honeymoon called the Cullasaja Gorge. It (obviously) holds a special place in my heart so although I walked away at first I came back and snatched it up. Lucky for me, it fit perfectly next to our office door.

I've also been obsessing about having a map with pins in it showing places Tim & I have visited together. For our anniversary I found a vintage map of the US and had it mounted to foam core then framed with a linen frame inset within a wooden one and opted to leave it without glass. I bought some gold-headed map pins off of Amazon and dipped them into wood glue before placing them on my map (look for the little sparkly dots on the map picture). That piece finished out the office door side of the hallway & it was time to dive into the big blank wall.


For the large blank wall I went with my second plan of 16x20 photos of gates on the wall. Just bear with me for this one. I bought 5 16x20 frames matted down to 11x14 pictures from Target & went to work figuring out the spacing, then I threw all of that out. I found the middle of the wall, figured out the height of my middle piece and hung it. Then I went to the side of the wall with the light switch & hung that one. Based on how far away from the edge that was I hung my far left piece. From there I measured from nail to nail, split that number in half & placed the last two on those measurements. Clear as mud? Oh & I used a laser level to make sure they were all at the same height based upon the first center piece I hung. Basically it was a good deal of guesstimating & hoping which luckily worked out perfectly to give me this beauty.

Now I have to take the pictures that go in these, I have a few "for sures" so far but still trying to figure it out. I know I want the pictures to be of gates that have some significance to Tim & myself but still working on the finer points of that. Anyways, here is the final space with my lackluster camera skills.


I've been desperate to get one room in our house finished. I never realized just how expensive & time consuming decorating a house would be. For us its been a combination of lack of funds & lack of time that have really kept our house from becoming what I want it to be. Thanks to my Uncle Sam savings plan (aka paying more into taxes than I should just so I can get a fat little check once a year - I know, not the best idea ever) I finally have (almost) finished up a room - all that is lacking now are the pictures & crown molding (moulding?).
So in case you've forgotten, here is what the hallway looked like originally as well as what my plans were. A family gallery wall may be something we work on later but for now it's gotten the kibosh. Instead I decided to combine a few of my ideas from around the house into this area. I've been looking for a runner everywhere I go for this space but a 2.5'x14' runner is not an easy find (FYI- when building a house make sure you look at what size rugs will fit in each room & make sure standard sizes fit. Trust me on this one). I finally found one I liked at West Elm, unfortunately it was exactly half the length of what I needed.
Lucky for me, inspiration hit. Why wouldn't this look just fine lying next to another with the patterns butting up against one another? I ordered 2 during their 20% off rug sale and waited for delivery. I rolled them out the second I got home & got lucky that my plan worked pretty well. Its been a few weeks and they are still settling a bit but so far rug pads seem to be holding them pretty steady although I think I may use some carpet seam tape to make sure they are really secure. They've also held up pretty well for being so close to the entrance and with a puppy and husband who come in the house with who knows what on their feet.


That same weekend I went to an event called Artisphere where lots of local artists have tents and sell their creations. I found one painter whom I loved and he happened to have a framed painting he was selling of the area where Tim & I took our mini-honeymoon called the Cullasaja Gorge. It (obviously) holds a special place in my heart so although I walked away at first I came back and snatched it up. Lucky for me, it fit perfectly next to our office door.

I've also been obsessing about having a map with pins in it showing places Tim & I have visited together. For our anniversary I found a vintage map of the US and had it mounted to foam core then framed with a linen frame inset within a wooden one and opted to leave it without glass. I bought some gold-headed map pins off of Amazon and dipped them into wood glue before placing them on my map (look for the little sparkly dots on the map picture). That piece finished out the office door side of the hallway & it was time to dive into the big blank wall.


For the large blank wall I went with my second plan of 16x20 photos of gates on the wall. Just bear with me for this one. I bought 5 16x20 frames matted down to 11x14 pictures from Target & went to work figuring out the spacing, then I threw all of that out. I found the middle of the wall, figured out the height of my middle piece and hung it. Then I went to the side of the wall with the light switch & hung that one. Based on how far away from the edge that was I hung my far left piece. From there I measured from nail to nail, split that number in half & placed the last two on those measurements. Clear as mud? Oh & I used a laser level to make sure they were all at the same height based upon the first center piece I hung. Basically it was a good deal of guesstimating & hoping which luckily worked out perfectly to give me this beauty.

Now I have to take the pictures that go in these, I have a few "for sures" so far but still trying to figure it out. I know I want the pictures to be of gates that have some significance to Tim & myself but still working on the finer points of that. Anyways, here is the final space with my lackluster camera skills.


Tuesday, May 29, 2012
No Excuses
There've been quite a few changes in my life recently not limited to a new job, raising almost $15,000 for cancer research, dealing with multiple different courses of treatment for Tim (and about to start a new one), trying to keep a house together, trying to keep my sanity & trying to keep up a social life, but honestly I just got bored of blogging for awhile (pbly bc I've been keeping up with Tim's blog so much). Still probably won't be back full time but thought I'd catch everyone up on what I've been up to lately!
So here are a few posts you can look forward to reading sometime (hopefully soon):
A new dog bed - constructed by me (& my dad)
My latest obsession - Accupuncture!
Dehydrating Food - aka what not to do
Refinishing a buffet - still can't believe I did it
Some things I'm dreaming about right now
Hanging a flatscreen/hiding the cables
New kitchen rug, trash can (& soon curtains)
New hallway runner(s) & art
New bedroom art
Restructuring the bathroom gallery wall
Curtains for the front door
New art for the den & new (to us) couches
San Francisco Trip
Refresh of the pantry
Little landscaping refresh
Garage Clean-out/Basement Organization
And here are some (hopefully) upcoming projects that will be happening at the hizzay sooner than later:
Cabinets in the laundry room
Replace transom in the laundry room (seriously dad...lets finish this one! :))
Staining/sealing the back deck (yep 2 1/2 years later we still haven't done this)
More landscaping...
Master Bedroom curtains
Hallway Art Project
Master Bedroom Art Project(s)
Front/Back Hall Light Replacements (might as well do it at the same time)
Front Hall Rug
....told you I've been busy.
Monday, December 5, 2011
Laundry Room Update
It has been a LONG weekend thanks to our "buddies" over at Sears. First things first, in case you are just starting out with us, here is where our laundry room started and here is where we were last time with the planning.
We got the floors placed last week and painted & installed the quarter round. Also repainted the entire room & all of the trim because apparently painting over 2 year old paint is kind of obvious...basically the room looked fantastic, just needed the washer & dryer in place to get started on our next steps.


Then the fun began...Sears came about 4:30 on Friday and delivered our new washer & dryer. They looked fantastic!

Unfortunately they didn't tighten up the intake hose as much as they should've & as we pulled out our first load of laundry we heard the unmistakable sound of dripping water. I climbed over the tops & saw a giant puddle of water on our brand new floors just sitting there. We immediately called the Sears store we purchased them from who sent us to the customer service number. Long story short it was 3 the next afternoon before anyone actually showed up to fix it. I've never experienced such terrible customer service in my life. Each entity was trying to push off the responsibility to the other so now we will get to deal with their insurance adjusters & so on. Let me tell you just how excited I am about this...oh & on top of everything else, they got scuff marks & dings all over my freshly painted walls & trim after climbing all over the new washer & dryer to try to tighten the hoses. They also dinged up the top of the washer & dryer with all of the gymnastics...ugh.


Anyways, all is fixed (for now) and our next step will be installing crown molding this week as well as trying to see if we can trim down the old transition piece to reattach. I'm hoping to have the entire room completed by January, we'll see how it goes once we determine just how much is damaged! We really are counting our blessings that we discovered it that night rather than days or weeks later.
Check out my list below to see how far we've gotten, I will be so excited to get one room in this house completed after 2 years!
We got the floors placed last week and painted & installed the quarter round. Also repainted the entire room & all of the trim because apparently painting over 2 year old paint is kind of obvious...basically the room looked fantastic, just needed the washer & dryer in place to get started on our next steps.


Then the fun began...Sears came about 4:30 on Friday and delivered our new washer & dryer. They looked fantastic!

Unfortunately they didn't tighten up the intake hose as much as they should've & as we pulled out our first load of laundry we heard the unmistakable sound of dripping water. I climbed over the tops & saw a giant puddle of water on our brand new floors just sitting there. We immediately called the Sears store we purchased them from who sent us to the customer service number. Long story short it was 3 the next afternoon before anyone actually showed up to fix it. I've never experienced such terrible customer service in my life. Each entity was trying to push off the responsibility to the other so now we will get to deal with their insurance adjusters & so on. Let me tell you just how excited I am about this...oh & on top of everything else, they got scuff marks & dings all over my freshly painted walls & trim after climbing all over the new washer & dryer to try to tighten the hoses. They also dinged up the top of the washer & dryer with all of the gymnastics...ugh.

Water on the floor

Water dripping down the washer

Look at the hose on the top right compared to the one on the bottom right,
you can still see the threads on the Y joint.
Check out my list below to see how far we've gotten, I will be so excited to get one room in this house completed after 2 years!
Order new floorsGet underlayment for floorsRemove shoe moldingInstall new floorsGet a pipe collar to cover where the new flooring meets the dryer vent.- canceled this, they don't make them...oh well!Install pipe collar- see aboveGet quarter roundPaint quarter roundInstall quarter-roundTouch up baseboards & quarter round- I actually ended up painting all of the trimRemove existing shelfTouch up walls- We unexpectedly ended up painting all of the walls too, oopsTouch up trim around doors (see here for the issue with it)Trim transition piece- Replace transition piece
Get washer/dryer deliveredOrder rugOrder new air register (ours was stark white & I found one in aged brass online for only $6)- Place in new air register
-
Get hooks for ironing board Install ironing board hooks- Buy crown molding
- Paint crown molding
- Install crown molding
- Buy cabinet materials
- Buy new dog bowls (the ones she has now are a little gaudy for my taste)
- Build cabinets
- Paint cabinets & cabinet trim
- Install cabinets
- Install cabinet trim
- Install cabinet knobs
- Buy hanging bar
- Install hanging bar
Replace light bulbs to be the swirly efficient kind (see why the peeps at Lowe's love me?)
Subscribe to:
Posts (Atom)